02 Nov 2014
Facebook released Mcrouter back on September 15th, they went through what it does and how it helps Facebook and other companies. Most of the documentation is on the Github wiki page, which has different types of setups, command line options and different supported features. It's a really great tool when you have a ton of clients connecting to your cache layer and need to route them appropriately.
One item they left off the documentation was SSL. It was clear you needed SSL certificate, private key and the signing CA public key. But wasn't clear was the implementation details and how the authentication between two Mcrouter's actually happened. I will clear that up for you here.
In Mcrouter authentication over SSL is certificate and IP based. The private key and certificate need to be signed by a trusted CA that the other Mcrouters can validate against. The certificate's alternative IP addresses need to match the IP address of the Mcrouter's server. Below I will show you how to create a CA, Private Key and Certificate to use with Mcrouter. (remember each private key and certificate is unique to each mcrouter and what ip addresses you add to the SAN CSR)
Install the necessary dependencies
RHEL/CentOS/Fedora:
Debian/Ubuntu:
apt-get install gnutls-utils
Create your CA private key and certificate (public key)
CA Private Key:
certtool --generate-privkey --outfile ca-key.pem
CA Public Key (certificate):
certtool --generate-self-signed --load-privkey ca-key.pem --outfile ca.crt
Does the certificate belong to an authority? Y
  path length -1
  Will the certificate be used to sign other certificates? Y
CA Signing Configuration (ca_config.txt)
expiration_days = -1
  honor_crq_extensions
Create your servers private key, csr and certificate
Private Key:
certtool --generate-privkey --outfile my_server_private_key.pem
For the CSR it needs to be a SAN certificate, for that you need to create a configuration file (my_server_csr_san_config) to send with the command (change the country, state, locality, organization as you see fit):
[req]
  default_bits = 2048
  default_keyfile = my_server_private_key.pem
  distinguished_name = req_distinguished_name
  req_extensions = v3_req

  [req_distinguished_name]
  countryName = US
  countryName_default = US
  stateOrProvinceName = California
  stateOrProvinceName_default = California
  localityName = Menlo Park
  localityName_default = Menlo Park
  organizationalUnitName  = Facebook
  organizationalUnitName_default  = Facebook
  commonName = my-mcrouter-server
  commonName_max  = 64

  [v3_req]
  basicConstraints = CA:FALSE
  keyUsage = nonRepudiation, digitalSignature, keyEncipherment
  subjectAltName = @alt_names

  [alt_names]
  DNS.1 = localhost
  IP.1 = 127.0.0.1
  IP.2 = <inbound ip address>
CSR:
openssl req -new -out my_server.csr -key my_server_private_key.pem -config my_server_csr_san_config.txt -batch
Create and sign the server's certificate:
certtool --generate-certificate --load-request my_server.csr --outfile my_server.crt --load-ca-certificate ca.crt --load-ca-privkey ca-key.pem --template ca_config.txt`
Use in the command line
mcrouter --ssl-port 11433 --pem-cert-path=my_server.crt --pem-key-path=my_server_private_key.pem --pem-ca-path=ca.crt
Just an FYI, I did end up adding this to the GIthub wiki for Mcrouter.
31 Oct 2014
A post I created a couple months ago talked about how I moved from a single server at Digital Ocean to Github pages service with Cloudflare. At that time I felt bad for not keeping SSL, since my custom domain would be work with Github pages free SSL service. But Cloudflare in recent weeks is now providing SSL for free accounts - allowing me to make my default SSL via some javascript.
If you inspect the certificate in your browser, you should see a multitude of domains, looks like they are trying to limit their costs by purchasing a SAN certificate for X amount of sites per certificate (I wonder if their CA blocks from having a certain amount of domains in the certificate request)
Check the Cloudflare blog for more details: https://blog.cloudflare.com/the-little-extra-that-comes-with-universal-ssl/
22 Jun 2014
I recently migrated my blog from a DigitalOcean server running Wordpress to Jekyll running on Github Pages, behind Cloudflare. I went from a paid server running a blogging software to a free service (github pages) with Jekyll as the static blog framework. During the move I noticed I would need to stop using SSL and that introduced the ability to use Cloudflare for free.
The reasons why I moved were:
What I lost not running my own server:
- HTTPS
- Google Adwords (no reason to keep them)
What I gained from using Github Pages, Jekyll and Cloudflare:
- Speed
- Uptime
- Backups
- Price
- Protection from Cloudflare
Losing SSL is tough for me as I am a supporter of SSL for everything, but the pros of moving slightly edged out the reasons to keep SSL. Though SSL is available via the non-custom domain name of this blog. (nictrix.github.io)
Getting better uptime and speed was a nice thing to have when switching, however it wasn't a prerequisite. An awesome reason to switch was free backups (I shouldn't say that, but I'm putting some trust in github pages)
I use a free pingdom account to monitor my blog and after moving it I checked the account and to my surprise I had a 633% decrease in response time, it went from 950 ms to 150 ms.
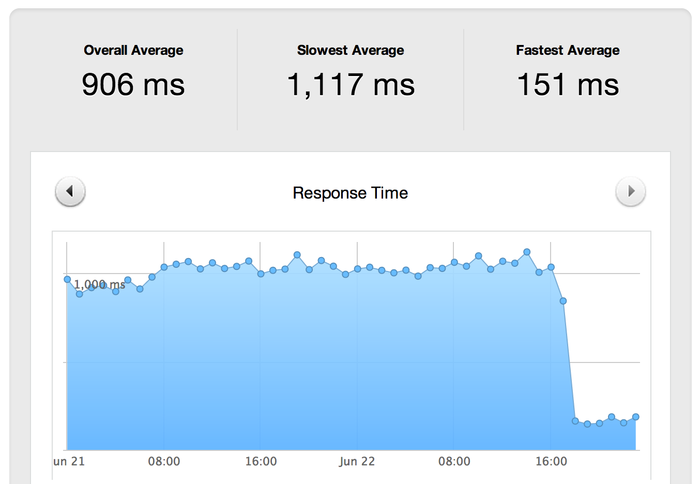
That speed decrease is very impressive! Using Github's infrastructure for speed and Cloudflare's services to provide protection and speed I greatly increased my availability and decreased response time. Thank you for such wonderfully free services!
22 Jun 2014
I found it a bit difficult to find Sinatra's proper way of gathering data from HTTP headers, such as Accept, Content Type and User agent. Once I figured it out it was still not the best piece of work. As you are required to find the accept header you require or need, then if you want to add the standard version into it, you'll want to parse out the accept parameters. See below:
accept = request.accept.find { |x| x =~ /^application\/vnd\.nictrix.net.*?$/i }
  version = accept.params['version'].to_i
As you can see from above the version is taken from the parameters of the accept hash. Another example is content type and user agent, which are much more straight forward:
request.content_type
  request.user_agent
Those are much easier to understand and use since they appear to be in the request object itself, most likely coming from rack itself and Sinatra is just making it easier on us. There should be an easier way to gather the version requested in sinatra as that seems to be the most used standard.
16 Jan 2014
I needed to understand multipart uploads with fog and how to keep the ETag MD5sum the same with multipart or single stream uploads to S3. In the end it was very embarrassing for Amazon to not have the ETag working the same for both. I understand the fact that both had a different route on getting to S3, but in the end 1 file is created meaning 1 ETag algorithm should be used.
The basics is to do the multipart upload, then overwrite the file with itself, S3 will then give you the proper md5sum under the ETag value. Below is the code to do the upload then copy the file to itself with a normalized ETag.
require 'fog'
require 'digest/md5'
require 'filemagic'
connection = Fog::Storage.new({ :provider => "AWS", :aws_access_key_id => access_key, :aws_secret_access_key => secret_key })

file = File.absolute_path(file)
file_name = "myfiles/#{File.basename(file)}"
file_md5sum = Digest::MD5.file(file).to_s

multipart_uploads = connection.list_multipart_uploads("myS3bucket")

multipart_uploads.data[:body]["Upload"].each do |part|
  if part["Key"] == file_name
    abort_result = connection.abort_multipart_upload(myS3bucket, file_name, part["UploadId"])
  end
end

content_type = FileMagic.new(FileMagic::MAGIC_MIME).file(file).split(';').first

file_temporary_directory = Dir.mktmpdir
file_split_result = system("/usr/bin/split -C 10M -a 4 -d #{file} #{file_temporary_directory}/")

file_md5_parts = {}

file_parts = Dir.glob("#{file_temporary_directory}/*").sort

file_parts.each do |file_part|
  file_md5_parts[file_part] = Digest::MD5.file(file_part).base64digest
end

s3_multipart = connection.initiate_multipart_upload(myS3bucket, file_name, { 'x-amz-acl' => access, 'Content-MD5' => file_md5sum, 'Content-Type' => content_type } )

s3_upload_id = s3_multipart.body["UploadId"]

md5_indices = []
threads = []

file_md5_parts.each_with_index do |file_md5_part, index|
  file_part_number = index + 1

  connection.reload

  threads < < Thread.new(file_md5_part) do |f|
    File.open(file_md5_part[0]) do |part|
      response = connection.upload_part(myS3bucket, file_name, s3_upload_id, file_part_number, part, { 'Content-MD5' => file_md5_part[1] } )
      md5_indices[index] = response.headers['ETag']
    end
  end
end

threads.each do |t|
  begin
    t.join
  rescue Exception => e
    puts "failed upload: #{e.message}"
    exit 1
  end
end

connection.reload

begin
  completed_upload_result = connection.complete_multipart_upload(myS3bucket, file_name, s3_upload_id, md5_indices)
rescue => error
  exit 1 if error.message =~ /400 Bad Request/
end

if completed_upload_result.status == 200
  copy_result = connection.copy_object(myS3bucket, file_name, myS3bucket, file_name, { 'x-amz-metadata-directive' => 'REPLACE' })

  if copy_result.status == 200
    exit 1 if copy_result.data[:body]["ETag"] != file_md5sum
  end
end
I have used examples of code from multiple locations on the web, mostly searching for 'multipart uploads fog'
http://blog.vicecity.co.uk/posts/168491-multipart-uploads-fog-threads-win
http://baldowl.github.io/2011/02/18/multipart-uploads-with-fog.html